
While I work on my favela map, I want to be able to render out a camera path consistently both from Houdini and from Unreal.
Rendering in Houdini is fairly straight forward so I’m not going to cover that part here in detail. Getting Unreal to dump out a movie that matches my camera movements in Houdini is a bit more troublesome. A LOT more troublesome it turned out.
NOTE: There’s some strange offset going on midway through the path, I’ll see if I can fix that and update the post.
Step 1. Create a moving camera in Houdini and export the data.

I started out creating 2 separate curves, one for the camera and one for the target. After a while, moving the target curve around with somewhat unsatisfactory results, I decided to let the target lead the camera using the same curve. This resulted in a much smoother (but less interesting) camera movement.
One small note though. I resampled the curve with a higher point count so that Unreal can match the Houdini curve more closely.

The curve points are exported to CSV using the Labs CSV Exporter.
Step 2. Import and create the curve in Unreal.

First create a simple Data Table to contain the point positions exported from Houdini.
Create a blueprint that reads the data table and creates a single spline.

A nice even spaced spline is created and we can start to look at how to make the camera move along it.

Step 3 Create a blueprint that switches to a cinema camera and starts the movement and records the whole thing.
Step 3.1 Create the main blueprint.
First I created a new blueprint (called ‘CinematicsCamera_BP‘) that will hold all the functionality of the camera movement.


Inside the CinematicsCamera_BP blueprint I created a custom event (‘Move Camera along Spline‘), in order to control when the camera movement starts. When the event is triggered it will set the cinematic camera as the new view target, move the camera along a path and record the whole thing with the Take Recorder.

The event is triggered from the level blueprint with a simple keypress (R).

Step 3.2 Store some variables.
The first thing I do is to store the input splines into a variable, mainly to simplify the graph.
Step 3.3 Prepare the camera.
I do not create a new camera within the blueprint but rather supply one from the interface as I found it easier to adjust the settings on the camera directly instead of through a blueprint.

Right at the beginning of the graph I switch from the player camera to the Cinematic Camera and update it’s position and rotation to fit frame 0. There is some serious syncing problems when doing stuff like this through blueprints so this step will minimize the number of things the engine will have to do when I start the recorder.
Step 3.4 – Set up the Take Recorder.
The next step is to set up the take recorder. This was a bit complicated and I had to do a lot of tries to get it working without frame drops.
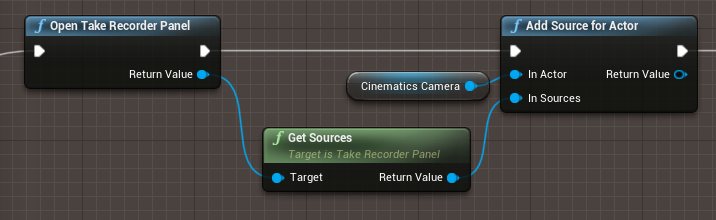
First the Cinematic Camera needs to be added to the Take Recorders sources in order to get recorded.
Next, open the Take Recorder once again (you need to do this every time you want to make a change it seems). Get the parameters and pass them on to the Start Recording node to start recording.
A very important detail here is setting the Engine Time Dilation to something low. I set it to 1/4. This allows the engine to finish what it needs to do in time. Just leaving it at 1 will most certainly produce some slight frame dropping. This is not a problem if you just record some gameplay but I am trying to match up to movies and they need to be as identical as possible.
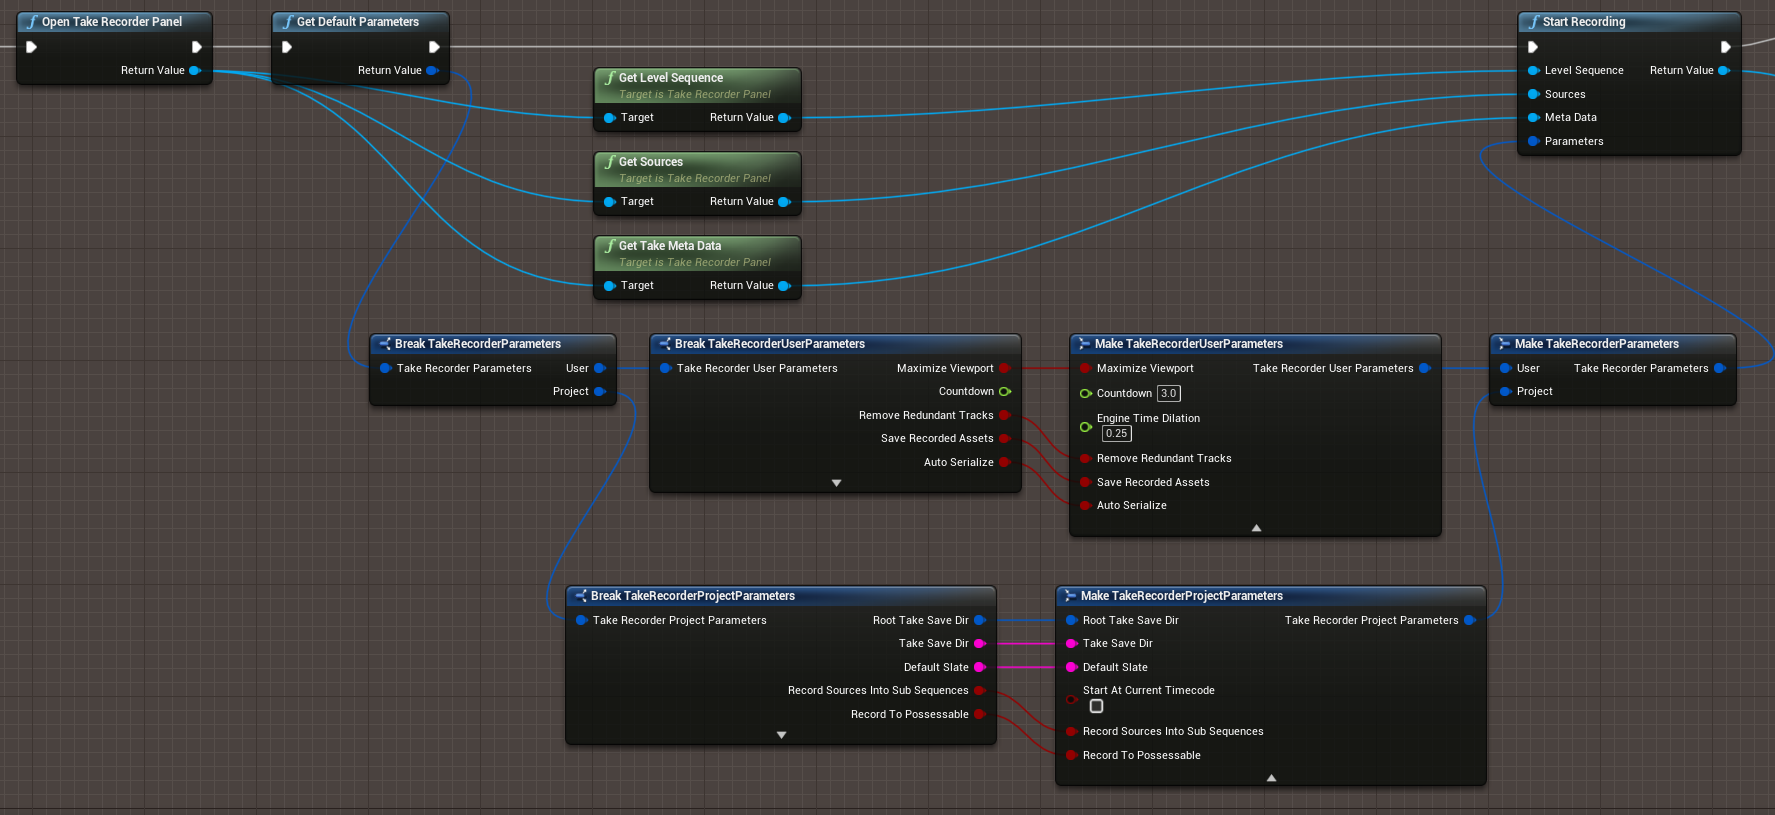
I added the nodes for all parameters and wired them up. It makes it easy to overwrite any settings that the user might have been doing in the Take Recorder directly in the interface. Just disconnect any connection to get the default value.
Step 3.5 A very annoying quick fix.
I found that the Take Recorder takes some time before it actually starts to record even though the execution flow have moved on. This results in the first couple of frames getting missed, and that’s useless. In order to prevent the execution to move on before the Take Recorder is ready and recording I had to do this little annoying thing. A Tick Event! There is probably a better way to solve this but for now it worked.
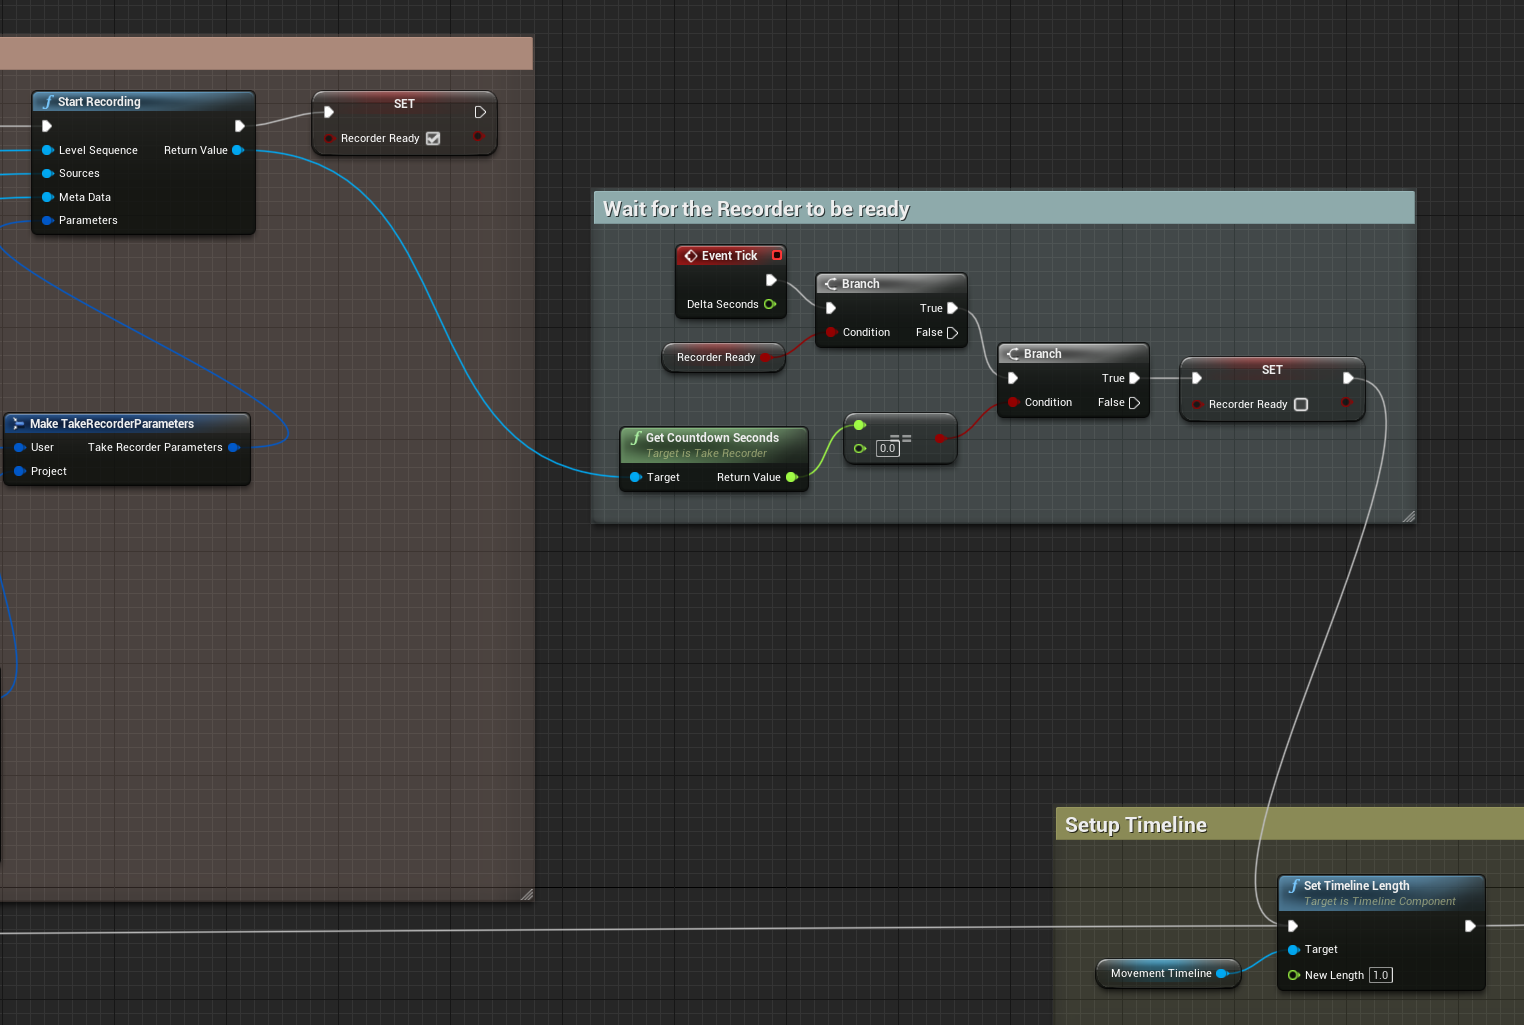
When the recorder is ready it sets the ‘Recorder Ready‘ boolean so the Tick Event execution can continue. Then we need to check that the count down have reached zero (remember to reset the ‘Recorder Ready’ boolean so that the execution only runs 1 time).
Step 4. Setting up the timeline.
Unreal have a very nice function for animating scene elements. The timeline basically runs for a period of time and for each update updates an output value (in this case a float named ‘Alpha‘).
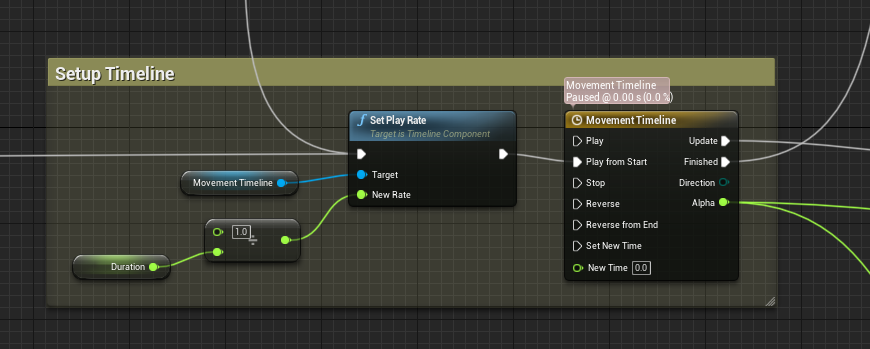

In order to keep things simple the internal curve in the timeline is set to go from 0 to 1 and produce a value from 0 to 1. The play rate is set to 1/duration in order to keep the timeline curve simple.
Step 5.1 Calculate Alphas.
The camera target is moving along the same spline as the camera (even though my blueprint also supports a separate path for the target) and is leading by 0.05 (5%). The Alpha value that comes from the timeline goes from 0-1 and we need it to go from 0-0.95 for the camera and 0.05-1 for the target. This is done by multiplying the alpha by 0.95 and then adding 0.05 for the target. Easy peasy.

Step 5.2 Update the Camera.
Then the camera position is updated by using the length of the spline and the camera alpha to find the position on the spline.
The target position on the spline is fount in the same way and used in a look-at node to get the rotation of the camera. Also pretty basic stuff.

Step 6 Cleanup.
When the timeline is finished there’s a little cleanup to do.
Step 6.1 Stop recording.
The Take Recorder is stopped.
Step 6.2 Reset source.
The the cinematic camera is removed from the sources.
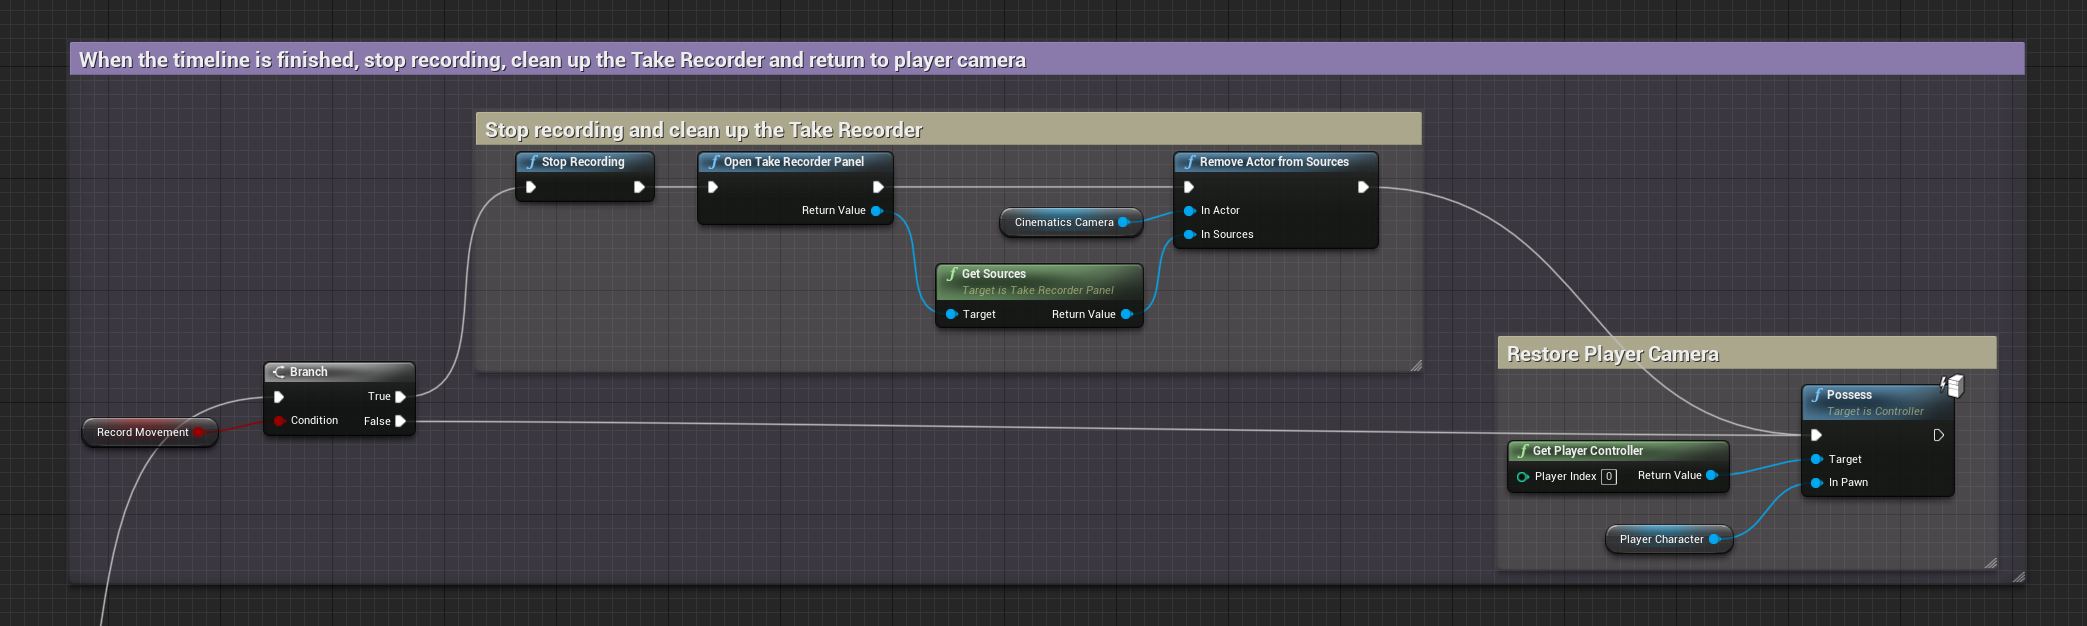
Step 6.3 Reset Camera.
The last thing to do is to set the camera back to the player camera. It would be a better solution to store a reference to the active camera in the beginning of the graph instead for more flexibility but this is good enough for now.
Step 7 Run the game and record.
Make sure the Take Recorder window is visible. Now run the game, press ‘R’ and watch the recording of the camera path.
